Using AWS Elastic Kubernetes Service, Docker, and Elastic Container Registry to build a cloud native website.

By David Dixon
July 31, 2024

Part 1; Prepping the image and using ECR

Recently, I wanted to take a look at turning my website into a cloud native application; designed to meet cloud-like demands of auto-scaling, self-healing, rolling updates, rollbacks and more. I also wanted to use it as an opportunity to take a look at Amazon Web Services (AWS) offering to achieve this. The website I am working with is static content. There isn’t much else to it besides some HTML and CSS. 
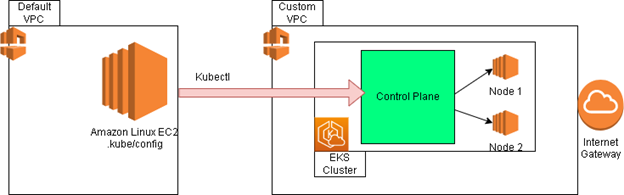
Since we’re running on an EC2 instance right now, we need to containerize our site. Here is an overview of what our process will look like. The image below gives an overview of the actions involved with migrating our website to a container, and then pushing to the ECR Repo.

Part 1 overview

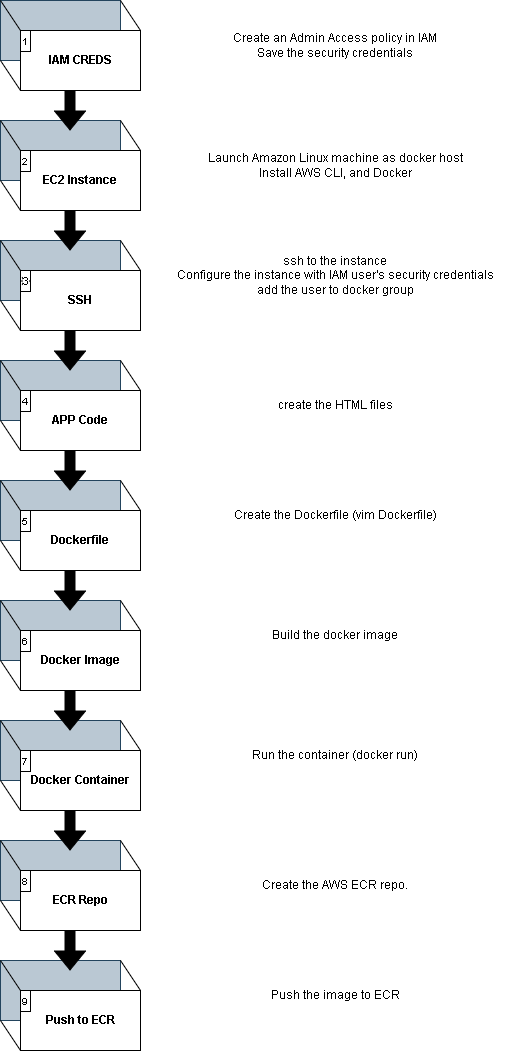
This image paints a broad picture of what is needed to transform our basic HTML site to a container and get it shipped to ECR. Let's jump in!

To set up the HTML for our site, I have some dummy code below. You can use this, or feel free to use your own:

            
              <!DOCTYPE html>
              <html>
              <body>
              <h1>My First Heading</h1>
              <p>My first paragraph.</p>
              </body>
              </html>


1. IAM Creation

Now we will create the IAM credentials/user. For the IAM user, navigate to the security credentials interface. Create a user with Administrator Access. Once this is done, save the security credentials in a secure location. You’ll need the Access Key and Secret Key moving forward when we perform the AWS CLI config.

2. Launch EC2 Client
Launch your EC2 instance. For my setup I chose the Amazon Linux EC2 instance. The official AMI is:

“al2023-ami-2023.4.20240401.1-kernel-6.1-x86_64”

After the EC2 instance is provisioned we need to update, install docker, start the service, and verify AWS CLI presence. You’ll use these when you SSH to your instance. Below are the commands to do so. You can make a script like the one below or do it live on the CLI:

            
              #!/bin/bash
              sudo yum update -y
              sudo amazon-linux-extras install docker 
              sudo yum install -y docker
              sudo service docker start
              sudo systemctl enable docker
              sudo usermod -a -G docker ec2-user


Now that docker is installed, check if the CLI is present with the “aws --version” command. If for some reason it is not (maybe you used a different AMI?) then do:

            
              #!/bin/bash
              curl "https://awscli.amazonaws.com/awscli-exe-linux-x86_64.zip" -o "awscliv2.zip"
              sudo yum update -y
              sudo yum install unzip -y
              unzip awscliv2.zip
              sudo ./aws/install


3. SSH to EC2 Instance

Remember how we ssh to our instance? It is fairly straight forward on Linux or Git Bash for Windows. We're assuming you stuck with the AMI recommended earlier; if not then replace ec2-user with the appropriate user for the key:

            
              ssh -i your.pem ec2-user@EC2-IP


Now, run your installs for docker and if needed AWS CLI. You can check them with the following commands:

            
              docker --version
              aws --version


Use the IAM credentials from step 1 to configure the instance on the EC2 CLI. You’ll need your key values, region, and the output type you want to use:

            
              aws configure


4. Create the HTML content

Let's now create the website's static HTML. Use the HTML from above, or make your own. Either way do the following:

            
              vim index.html

"PASTE HTML in the index.html file"

:wq (write and exit vim)


5. Create the Dockerfile

5. Now, let’s create the Dockerfile and add the content to the file. Add the Dockerfile in your website DocumentRoot, or the root content directory:

            
              vim Dockerfile


Add the Dockerfile content (with Comments). I am going to using nginx:alpine because it is lightweight and achieves our needs:

            
              #Nginx base image
              FROM nginx:alpine

              #Copy the website files to the nginx html directory
              COPY . /usr/share/nginx/html

              #Expose port 80 and 443
              EXPOSE 80
              EXPOSE 443

              #Start nginx when the container launches
              CMD ["nginx", "-g", "daemon off;"]


6. Create the Docker image

Let’s create the image using the docker daemon. Create the image with the following syntax, where "myimagename" is interchangeable. Make sure you’re in the same directory as your Dockerfile. Here is the command to build the image:

          
            docker build -t myimagename .


Check that your image is created with the following docker command:

          
            docker image ls


7. Test the Container

Create the docker container using the image we created above. Use the following docker command:

          
            docker run -d -p 80:80 myimagename


NGINX will listen for in and outbound connections to port 80, or the default web port. If your security groups and firewall allow it, you can navigate to your IP address in your browser and see the application. Give it a try and make sure it is working before we push to ECR.

8. Create ECR Repo

Once you verify that your container is working and the site is viewable, then we can push to ECR. First we will create a repo in AWS ECR. Navigate to the AWS ECR page, and click the create repositories button.

Create Repo Button

You can choose the settings you want for your repo, but typically I use a least privilege model, so I set my repo to private. If you want a public repo that is fine, but it will be available to others, so use caution.

9. Push Image to ECR Repo

Almost there! Let’s push our image to the ECR repo we just created. In order to do this click on the ECR repo that you just created. Good, now click on the “View Push Commands” button. There are 4 steps within this interface, which consists of the following:
a. Retrieve an authentication token and authenticate your Docker client to the registry via the CLI
b. Build the docker image (We already did this!)
c. Tag your image so you can push
d. Push the image to the new repo.

Good job, now if everything went alright you should see an output similar to the following:

Push to Repo 
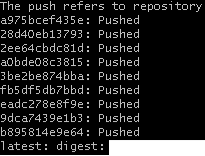
We can also navigate back to our AWS ECR web interface and see that the new image is available. In the next part we will use this image along with Elastic Kubernetes Service (EKS) to deploy our scaled application.

Part 2. Deploying in EKS

Let’s take a look at the overview of what we want to achieve in the next section. At this point we have our image tagged and pushed to ECR. We’re going to set up our client machine to interact with the Control Plane running on the EKS cluster we will create. The cluster will be housed in a Custom VPC which will run 2 separate nodes behind a Elastic Load Balancer. We will use the EC2 machine created in Part 1 to interact with the cluster.

EKS Overview

A breakdown of the steps to accomplish this is defined below. We should be able to re-use some of the steps from part 1 (IAM, Client Machine, SSH), but they are important none the less.

Part 2 Steps

Ok, let’s get started on part 2. Remember the IAM you created with AdministratorAccess in the AWS IAM console? We are going to be using this for our next steps as well. We’ll also just reuse our same EC2 instance from part 1 to connect to our EKS Cluster.

1. IAM (again?)
If you’ve already done this on the EC2 instance from part 1, then don’t sweat it; jump to step 2. If not then, navigate to the security credentials interface. Create a user with Administrator Access. Once this is done, save the security credentials in a secure location. You’ll need the Access Key and Secret Key moving forward when we perform the AWS CLI config.


2. EC2 Instance (Client)
let’s set up the client machine. We will use this machine to manage our K8S cluster. You should have set up an EC2 instance from part 1. If not then prepare the following for your Amazon Linux EC2 instance:

          
            #! /bin/bash
            curl "https://awscli.amazonaws.com/awscli-exe-linux-x86_64.zip" -o "awscliv2.zip"
            sudo yum update
            sudo yum install unzip
            unzip awscliv2.zip
            sudo ./aws/install
            curl --silent --location "https://github.com/weaveworks/eksctl/releases/latest/download/eksctl_$(uname -s)_amd64.tar.gz" | tar xz -C /tmp
            sudo mv /tmp/eksctl /usr/local/bin
            curl -o kubectl https://amazon-eks.s3.us-west-2.amazonaws.com/1.21.2/2021-07-05/bin/linux/amd64/kubectl
            chmod +x ./kubectl
            sudo mv ./kubectl /usr/local/bin


SSH and Setup Now that we are set up with our install script, ssh to the EC2 instance and execute the install from above. We can verify our toolset installation with the following commands:

          
            aws --version
            eksctl --version
            kubectl --version


If you didn’t already, configure the AWS CLI with your IAM credentials. Enter the following command:

          
            aws configure


4. EKS Cluster Setup

EKS Cluster setup will be performed using the “eksctl create cluster” command. EKSCTL is the official CLI for interacting with AWS EKS. Modify the variables to fit your needs.

          
            eksctl create cluster --name=mycluster \
                      --region=us-east-1 \
                      --zones=us-east-1a,us-east-1b \
                      --nodegroup-name mynodegroup \
                      --node-type=t2.micro \ 
                      --nodes=2 \  
                      --nodes-min=2 \
                      --nodes-max=4 \
                      --managed


This will produce your EKS cluster and you can navigate to the AWS EKS page to see the newly created cluster as indicated in the screenshot below:

EKS Creation
Let’s also break down the cluster configuration above. Set your region according to your needs, along with the zones, naming, and node-types. In our example I used a t2.micro since it is a simple proof of concept. However, if your application receives more traffic, adjust according to resource consumption and requirements. We can also see in the cluster configuration that we have 2 nodes min and 4 nodes max, with a target start of 2 nodes. Let’s try to understand this a little more.

Scaling Triggers

  • The nodes in the EKS cluster will scale up or down based on the workload demand. This is typically managed by the Kubernetes Cluster Autoscaler.

  • The Cluster Autoscaler monitors the resource usage (CPU, memory, etc.) and the scheduling of pods. If there are unscheduled pods due to insufficient resources, the autoscaler will scale up the number of nodes within the limits specified (--nodes-min and --nodes-max).

  • Similarly, if the resource usage drops and nodes become underutilized, the autoscaler can scale down the number of nodes, but it will not go below the minimum specified (--nodes-min).


  • Resource Usage-Based Scaling

    Scaling is based on resource usage and pod scheduling requirements. The Cluster Autoscaler evaluates the resource requests and limits set for the pods and determines if there are enough resources available to schedule the pods. If not, it scales up the nodes. If there are too many underutilized nodes, it scales them down.

    Let's jump back into the configuration and check if the kubeconfig file is present on the EC2 client machine. Check the $HOME/.kube directory. This configuration file will have information about clusters, users, namespaces, and authentication mechanisms. If it is not present you may need to manually create it. For my deployment I ran:

              
                aws eks update-kubeconfig --region us-east-1 --name mycluster


    Now we can see (check it!!) the file in the path: /$HOME/.kube/config

    Deployment and Service

    We will now create a deployment service using kubectl. We will update the image url of deploy.yaml according to the URI on your ECS. To do so use your favorite editor, vim, to create the deploy.yaml file (vim deploy.yaml):

              
                apiVersion: apps/v1
    kind: Deployment
    metadata:
          name: mynginxdeply
    spec:
          replicas: 2
          selector:
               matchLabels:
                    app: mynginxpod
          template:
              metadata:
                    labels:
                        app: mynginxpod
              spec:
                    containers:
                         - name: mynginx
                           image: {image URI} public.ecr.aws/a1b2c3d4/my_nginx
                           ports:
                                 - containerPort: 80
    ---
    apiVersion: v1
    kind: Service
    metadata:
          name: mynginxserv
    spec:
          selector:
               app: mynginxpod
          ports:
               - protocol: TCP
                 port: 80
          type: LoadBalancer


    Then after you have saved the deploy.yaml file, apply it with kubectl:

              
                kubectl apply -f deploy.yaml


    We are now going to deploy the replica set, pod, and service type of load balancer as specified in the yaml instructions above. We will now apply to the control plane with kubectl:

              
                kubectl get deploy
                kubectl get rs
                kubectl get pod
                kubectl get svc


    Check the Deployment

    If all jobs completed without error, get the load balancer’s DNS name and paste it in your browser (also check your security groups). You should be able to now view your application!

    Great job! We took a quick look at how we can leverage AWS ECS, EKS, along with containers to build a scalable, cloud native website. This approach can be leveraged for webapps, microservices, and other applications that need all the features that a cloud native design provides. Afterwards if you want to remove your cluster, you can run the following eksctl command:

                  
                    eksctl delete cluster --name mycluster --region us-east-1


    I hope you enjoyed this post. I'll be covering Kubernetes, Docker, and other automation topics in the near future.

    “Before anything else, preparation is the key to success.” — Alexander Graham Bell