Part 1; Prepping the image for auto install
Lately I have been thinking about how to leverage a common framework to deploy to both on premise, and cloud providers for a multi-tenancy deployment
approach. Organizations are increasingly pivoting to cloud providers such as AWS, GCP, or Azure. Additionally, organizations may have either sunk cost or a need to upkeep their on
premise hardware in paralell. In this series we'll look at deploying AMX to both on premise and cloud providers.
One of the core elements for how we will deploy is the creation of a custom ISO. The custom ISO will allow us to autoprovision the infrastructure without the need for
user interaction. We will pass in information regarding the network configuration, disk partitioning, ssh key, keyboard layout, packages, and user credentials. This approach
provides a cost savings versus manually inputting each piece of information. Let's take a look at the process overview image below.
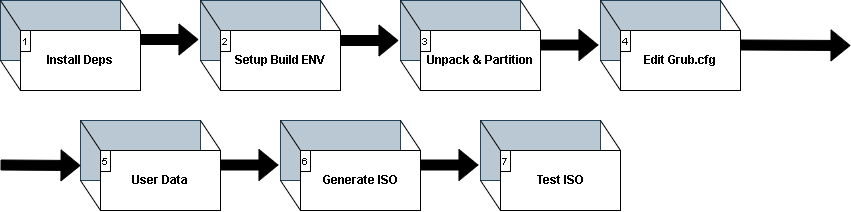
We will be installing our dependencies used to build the iso in step 1. Then, we stage the build environment in step 2. Next, we will unpack the source ISO for modification in step 3.
Step 4 modifies the grub boot menu to add our new auto-install option. In step 5 we have the custom, user-defined data mentioned in the paragraph above. Step 6 deals with
generating the new ISO. And finally we will test our ISO using Terraform + Powershell in step 7.
I am using Ubuntu 22.04 for my ISO, but feel free to choose which ISO works for you. You can download it here if you would like: https://releases.ubuntu.com/jammy/ubuntu-22.04.5-live-server-amd64.iso
Ok, now that we have an overview, let's get going on the ISO creation!
1. ISO Dependency Installation
We will be installing the dependencies used to create the custom ISO image. We'll use the following:
sudo apt install p7zip-full p7zip -y
sudo apt install xorriso -y
We also use wget to pull the latest ISO if you don't have a web browser enabled. Next, we are going to set up the build environment for our ISO.
2. Set up the Build Environment
The build environment is where we will be unpacking our source ISO. This should be fairly straight forward:
              mkdir 22_04-auto-ISO
              cd 22_04-auto-ISO
              mkdir source-files
              wget https://releases.ubuntu.com/jammy/ubuntu-22.04.5-live-server-amd64.iso
Nice! We'll move on to unpacking the ISO.
3. Unpack and partition the ISO
The Ubuntu 22.04 ISO layout will have separate partition space for Master Boot Record (MBR), install root image, and the Extensible Firmware Interface (EFI). To unpack we will use 7zip.
7z -y x jammy-live-server-amd64.iso -osource-files
In the "source-files" directory the ISO files are extracted. Additionally, the source-files directory has a folder named '[BOOT]' which will contain the "1-Boot-NoEmul.img 2-Boot-NoEmul.img" files respectively. These MBR and UEFI files will be important when generating the new ISO. Let's update the files and move them to a staging area.
mv '[BOOT] ../BOOT'
4. Update the boot menu
We want to add a boot option for our new ISO, so we will be editing the ISO grub.cfg file. I use vim, but using your editor of choice, modify the "source-files/boot/grub/grub.cfg" file. Inject the following statement above the existing menu entries:
              menuentry "Ubuntu Server 22.04 Auto Installation" {
                set gfxpayload=keep
                linux   /casper/vmlinuz quiet autoinstall ds=nocloud\;s=/cdrom/server/  ---
                initrd  /casper/initrd
            }
Note the menuentry line; This can be whatever you want it to be in the quotes. For simplicity, I have named mine "Ubuntu Server 22.04 Auto Installation". The
entry above does the following:
Ok, now let us add the directory for the user-data and meta-data files that will be used to perform the auto installation. Jump on the shell and then:
mkdir source-files/server
If you want to, you can add more folders to contain alternative user-data configs, or extra grub configs pointing to the directories.
5. Create the Custom autoinstall user-data files
Great, we have made it this far! Let's jump into the core of the auto-installation config. The user-data file can be thought of like an answer file. Note that the user-data file uses YAML to provide directives. If you would like, you can check out the format and other examples here, Cloud Init Docs. For this, I have provided a sample user-data file that we will use to get going. Feel free to add to this, or modify it to suit your needs.
              #cloud-config
              autoinstall:
                version: 1
                # Remove interactive sections to avoid user input
                storage:
                  layout:
                    name: lvm
                    match:
                      size: largest
                locale: en_US.UTF-8
                keyboard:
                  layout: us
                identity:
                  hostname: amx-000
                  #Change ME! I use: openssl passwd -6
                  password: $6$gK6xB150l.......
                  username: ubuntu
                ssh:
                  allow-pw: true
                  install-server: true
                apt:
                  primary:
                    - arches: [default]
                      uri: http://us.archive.ubuntu.com/ubuntu/
                packages:
                  - build-essential
                  - network-manager
                  - dkms
                  - emacs-nox
                package_update: true
                package_upgrade: true
                late-commands:
                  # Changing from networkd to NetworkManager
                  # move existing config out of the way
                  - find /target/etc/netplan/ -name "*.yaml" -exec sh -c 'mv "$1" "$1-orig"' _ {} \;
                  # Create a new netplan and enable it
                  - |
                    cat <<EOF | sudo tee /target/etc/netplan/01-netcfg.yaml
                    network:
                      version: 2
                      renderer: NetworkManager
                    EOF
                  - curtin in-target --target /target netplan generate
                  - curtin in-target --target /target netplan apply
                  - curtin in-target --target /target systemctl enable NetworkManager.service
                  # Install NVIDIA driver (with apt-get flags)
                  - curtin in-target -- apt-get -y install --no-install-recommends nvidia-driver-520
You will need to update the password at minimum. You can use openssl passwd -6 to generate the credential. The rest of the example you're free to modify as needed.
This configuration file will allow us to perform an installation without requiring user input during the Distro installation.
You may want to consider using a YAML linter to check the validity & structure if you choose to modify. A free online YAML linter is available at YAMLLINT.
6. Generate the New ISO
If your YAML checked out (assuming you modified), then let's generate the ISO! To do this we are going to use xorriso.
            xorriso -as mkisofs -r \

              -V 'Ubuntu 22.04 LTS AUTO (EFIBIOS)' \

              -o ../ubuntu-22.04-autoinstall.iso \

              --grub2-mbr ../BOOT/1-Boot-NoEmul.img \

              -partition_offset 16 \

              --mbr-force-bootable \

              -append_partition 2 28732ac11ff8d211ba4b00a0c93ec93b ../BOOT/2-Boot-NoEmul.img \

              -appended_part_as_gpt \

              -iso_mbr_part_type a2a0d0ebe5b9334487c068b6b72699c7 \

              -c '/boot.catalog' \

              -b '/boot/grub/i386-pc/eltorito.img' \

              -no-emul-boot -boot-load-size 4 -boot-info-table --grub2-boot-info \

              -eltorito-alt-boot \

              -e '--interval:appended_partition_2:::' \

              -no-emul-boot \

              .
In the above we add the extracted partitions from step 3 back into our new ISO.
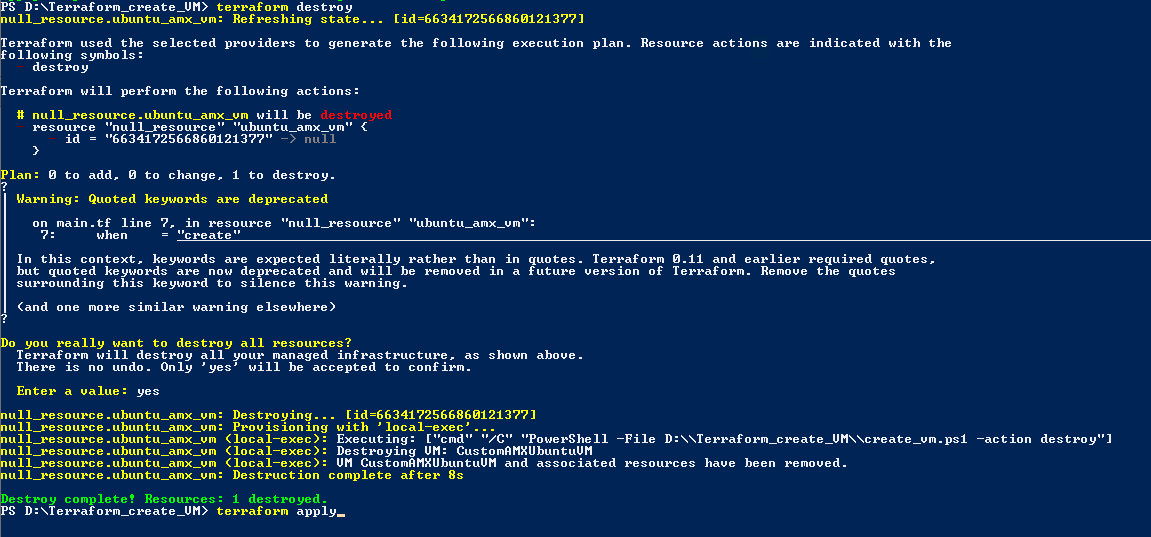
7. Deploy / Test the ISO
Now, create a test VM in HyperV (or whatever target) that you can use to test the newly created ISO. I won't go through all of the specifics of manual testing since each environment may be different.
We can also navigate back to our AWS ECR web interface and see that the new image is available. In the next part we will use this image along with Elastic Kubernetes Service (EKS) to deploy our scaled application.