Using Gitlab + Ansible to automate your Infrastructure
Are you searching for a cost effective solution to automate content delivery like patches, updates, or other packages to your systems?
Do you want to save time and money with a method that uses automated delivery mechanisms?
Maybe cut down on the time your admins spend with manual, error prone processes?
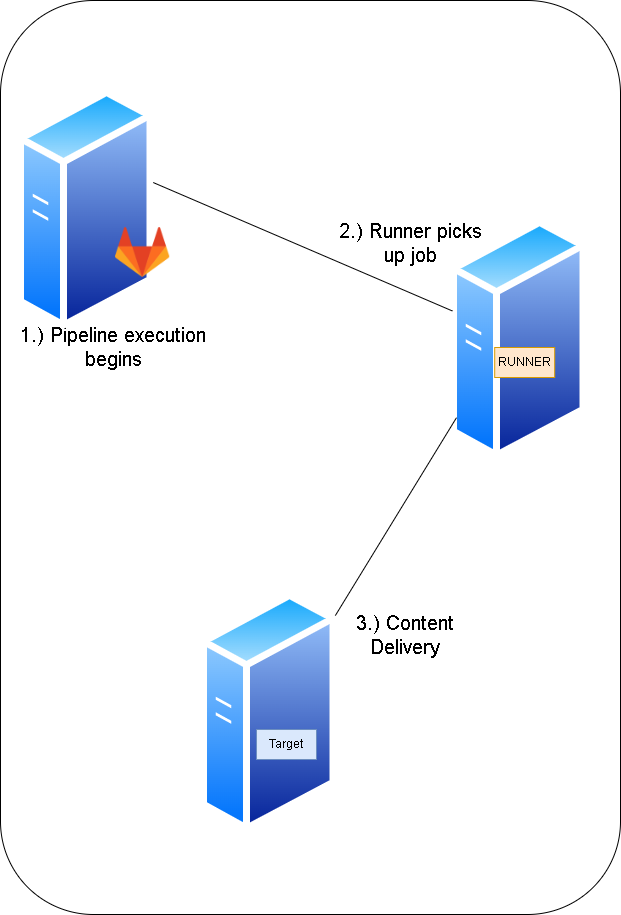
In the following tutorial we will be using an architecture depicted below consisting of a 3 tier system;
Our Gitlab server which hosts the code and pipelines, a runner server responsible for picking up the job, and the target server where content is delivered.
For simplicity I am hosting each of the components on the same LAN.
Idempotency is the property of certain operations whereby they can be applied multiple times without changing the initial result.
In this tutorial we’re going to apply the principle of idempotency in a simple demo using Gitlab coupled with Ansible to patch some of our systems.
Let’s jump in to the project setup.
Setup the Target Machines
In order to deliver the payload we need to setup access on our targets using SSH. We’ll cover setting up the SSH keys in the next session.
Create the SSH Keys
We’re going to be using SSH to communicate with our infrastructure. It’s secure, proven, and available across all of my Linux servers, yay.
To do that let’s set up our SSH keys that will be passed during our pipeline in order to communicate with our target hosts.
To get started jump over to our gitlab server and generate private and public keys with the following command:
ssh-keygen
Press the Enter key three times until the command finishes. A public key file “~/.ssh/id_rsa.pub” and private key file “~/.ssh/id_rsa” are then generated.
Now that we have the generated key pair, we need to copy the public key to the server to be managed. You can achieve this with the following command:
ssh-copy-id remote_username@remote_server_ip
At this point you should be able to log in to the remote server without using a password.
You’ll need the copy the contents of “id_rsa.pub” and “id_rsa” keys for later when we set up the repository variables.
Adding the user to Sudoers
We need to allow the playbook to execute without a sudo password.
In order to achieve this we will be modifying the sudoers file on our target Ubuntu systems. Let’s first gain root access:
sudo -i
Next, consider backup up your "/etc/sudoers" file in case something goes wrong:
cp /etc/sudoers /etc/sudoers.bak
Now, edit the /etc/sudoers file with the visudo command:
visudo
You'll need to add the user user you will specify for logon in your host file later to the sudoers file.
For example if you will be using the user ‘patchuser’ on each of your systems you would add the following in the sudoers file:
patchuser ALL=(ALL) NOPASSWD:ALL
I added the above command to the end of the sudoers file using "visudo".
Now your user will be able to patch without using a password in the playbook. Be aware of the risks associated with the above command.
If you want to tailor the sudo user or group to your playbook executions, by all means please do so. The above is only for demo purposes.
Take a look at my video part 1 on setting up the environment.
Setting up the Gitlab Runner
In this section we’ll setup docker as the runner for our environment.
You’re welcome to use the shell or other executor on your own.
Runner Setup
In order for our repository to execute the playbook we need to have a runner assigned. To do this I am going to head over to my runner server and login.
After you do that, navigate to your project/repo > Settings > CI/CD page.
Take note of the registration token since you’ll be passing this during your runner’s registration.
Now, back to the runner server. Once you’re logged in do the following:
sudo gitlab-runner register
You will need to provide the following at the prompts:
Your gitlab URL
Token Value
Description
tag (I use infrastructure_as_code
maintenance note
Executor (I use docker)
Docker image (I use “ubuntu:jammy” to match package installs in my gitlab-ci.yml)
After you provide info on the prompts, press enter and check out your CI/CD settings on your repo.
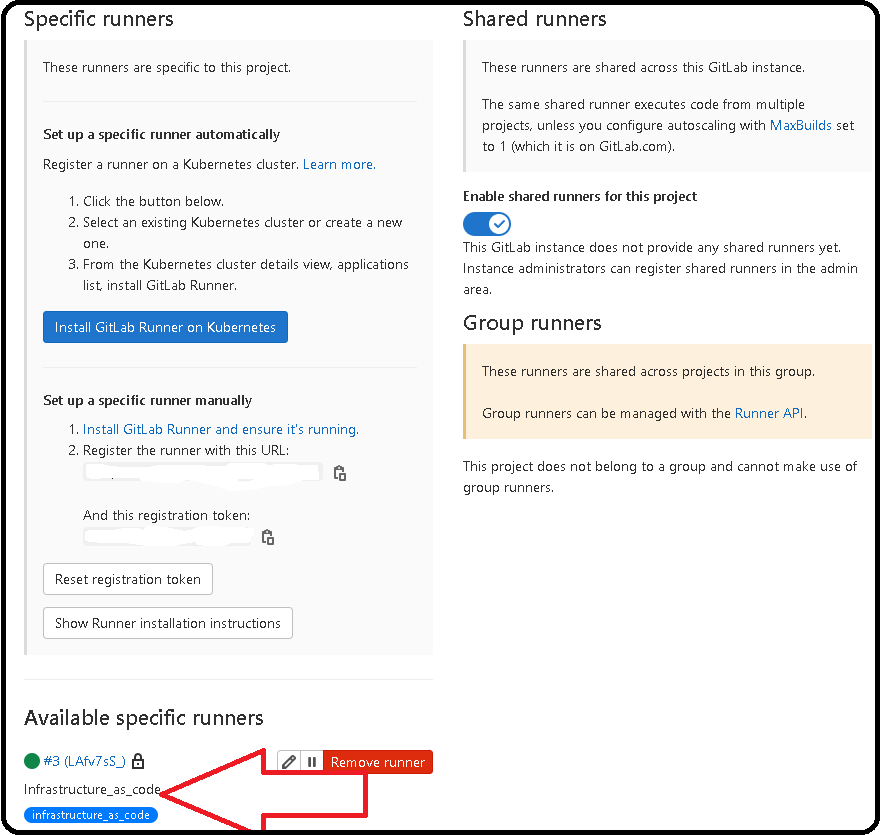
You should see the available “Infrastructure_as_code” runner in your Settings>CI/CD>Runners section as shown in the graphic below:
Setting up the Gitlab Repository
In this section we’ll setup our repo in gitlab. We'll add our variables and start defining our pipeline code in yaml format.
Adding the pipeline variables
We will be using Gitlab to kick off our CI/CD pipelines for content delivery. If you’re not familiar with Gitlab, that’s ok.
It is an awesome, free product that you can use to version control and deploy code.
There are a lot of other nice features that we’ll get into in other articles. Anyhow, head over to your repo that you just created.
We need to add the key we created earlier as a variable to our repository so we can pass them into each of our stages and log into our target hosts.
Head over to the repo and select “Settings>CI/CD”. Once you are in click the “Expand” button in the Variables section.
Click the “Add variable” button. In the “Key” field I input “pub_key” and the value field will be that of your public key created earlier.
Once you’re done, click the “Add variable” button.
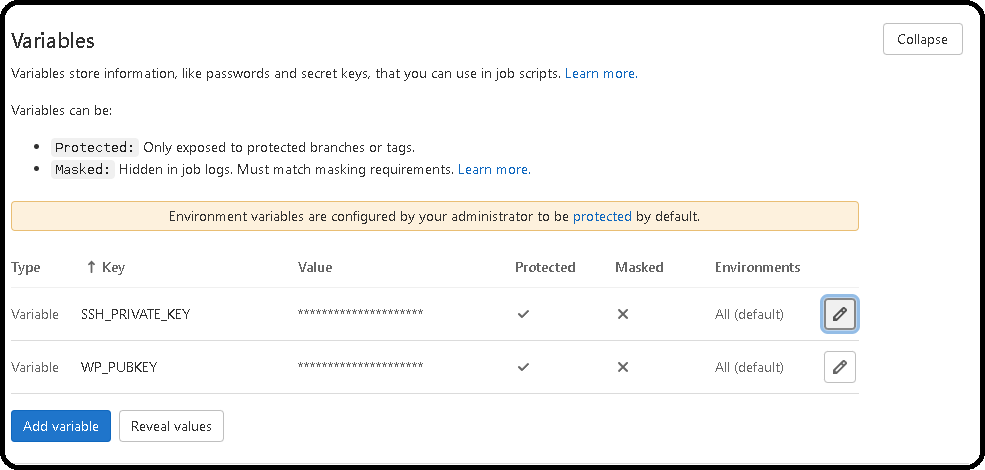
We’re going to add another variable now for our private key. Click the “Add variable” button. In the “Key” field input “SSH_PRIVATE_KEY” from the key you created earlier.
Once finished click the “Add variable” button. Now we have the variables set for use in our pipeline. When you’re done, you should have something like the below.
Unless you specifically added tags to your pipeline, and for demo purposes you may want to uncheck the "Protect variable" checkbox on the newly added variable.
Make sure you either tag your pipelines, or uncheck for the demo.
Repo Files
I’ve put the content on Github if you want to pull it and follow along.
Let’s take a look at the files we will use in our pipeline. Our repository will initially have the following file structure:
.gitlab-ci.yml - This is the configuration file used in Gitlab for setting up and defining Continuous Integration / Continuous Deployment (CI/CD) pipelines.
It is a critical element that defines the steps and actions to be executed when changes are pushed to the repo. Let’s look at our configuration file below:
Notice how we're passing in the variables we saved that have the dollar sign ("$") in front of them.
Since we protected them to our infrastructure as code tag, they can only be used in this or other properly tagged pipelines.
Here’s a breakdown of the provided configuration:
1. Stages Definition: The stages section defines the order in which the stages should run.
2. Variables: The variables section defines environment variables used in the pipeline.
It sets ANSIBLE_HOST_KEY_CHECKING to “False,” which disables strict host key checking when using SSH with Ansible. Since this is for a demo, I’ve disabled it.
However, you might add your keys to the known host list. The SSH_PATH variable defines the path to the SSH directory, ~/.ssh/.
3. Do_Prechecks Stage: This stage executes pre-checks using the precheck.yml Ansible playbook on the target hosts.
Before running the playbook, it installs necessary dependencies (e.g., openssh-client, ansible) and adds the provided $SSH_PRIVATE_KEY to the SSH agent using ssh-add.
4. Start_Patching Stage: This stage executes the patching process using the apt_upgrade.yml Ansible playbook on the target hosts.
It is set to run only when the previous Do_Prechecks stage succeeds (when: on_success).
5. Do_Postchecks Stage: This stage executes post-checks using the postchecks.yml Ansible playbook on the target hosts.
It is set to run only when the Start_Patching stage succeeds (when: on_success).
6. Tags: The tags section associates specific runners (GitLab Runners) with the jobs in each stage.
The provided tags are infrastructure_as_code, which means only runners with this tag will execute these jobs.
Now let's take a look at the precheck.yml playbook. precheck.yml – This will perform various checks and gather system information from hosts.
This playbook will execute as the first stage of our pipeline:
postchecks.yml We’ll check the host’s OS details such as the kernel version, architecture, etc. and output to the pipeline. The playbook is defined below:
hosts - Specifies the target host IP’s / hostnames for content delivery in this file.
Use the following format, where “ubuntu” is your server list name, patchuser is the user you’ve set up and hostname/IP correlates to your system.
Once you’re good with your files (did you remember to lint your yaml?), verified your hosts are reachable, validated the runner is ready,
and checked the rest of your dependencies, go ahead and commit.
Pipeline
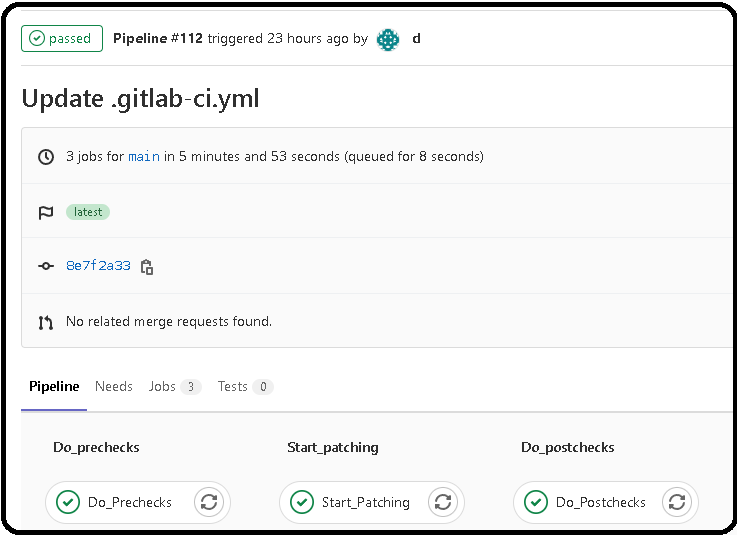
If everything went smoothly, check out your pipelines on your repo. Click on “CI/CD>Pipelines” from the left nav bar.
We can see each stage of our pipeline executed as expected, and you should see something similar to the graphic below.
The cool thing about this is that we can now drill down into the output of each stage of the pipeline.
Click the “Do_Prechecks”, or one of the other pipeline states.
We can cut down our patch, update, or security deployment time significantly across our infrastructure.
Additionally, it can reduce the number of errors that typically arise with manual process.
Hopefully it gives us more time to focus on other tasks that really deserve our time as well. Check out part 2 of the video series to follow along!
Someone is sitting in the shade today because someone planted a tree a long time ago - Warren Buffett